
Why I dislike GUMPS
The use of the GUMPS check has never made any sense to me. It is usually taught to students flying simple trainers and doesn’t really apply. I’ll describe an alternative after I dissect the current practice.
GUMPS usually stands for Gas, Undercarriage, Mixture, Prop, Safety. Sometimes GUMPRS, adds Radios to the list and C-GUMPS for carb heat. In my Cessna 182 the fuel selector is set to both in the initial pre-flight check and is never changed, the undercarriage is fixed so it is always down, the mixture needs adjusting but is usually full rich by the time I’m in the pattern, the prop isn’t an issue for most trainers since they are usually fixed pitch, and safety items should be completed well before entering the pattern. Repeating this list at various times is basically a waste of time and lulls the pilot into thinking that they are ready to land.
In addition, messing around with the fuel selector at pattern altitude is just a bad idea. This NTSB report is one of many where a pilot (in this case a student) turned the fuel selector in a airplane to OFF when performing a GUMPS check in the pattern.
I use a two stage checklist that starts just before beginning my descent or, if in the practice area, just before the initial call to the tower or CTAF. This is where you get things out of the way that you need to do only once. If you are not on a training flight, it would probably be 120 miles out. At 120 kts that would be only 10 minutes of flight time.
C-FARTS
The mnemonic that I use is C-FARTS—Compass, Fuel, ATIS, Runway, Traffic Pattern, Safety.
- Compass—Align the Heading Indicator with the compass. Make sure you are in straight and level flight before reading the compass.
- Fuel—Check the fuel levels. If you’re flying a plane that requires switching fuel tanks, switch to the one with the most fuel. Do you have enough fuel to arrive at the destination? Can you divert to another airport?
- ATIS—Monitor ATIS or request a minute off frequency to get the ATIS. Note the wind direction and which runway is in use.
- Runway—Which runway is in use, or at a non-towered airport, given the winds, which runway is expected to be in use.
- Traffic Pattern-Check the chart to see if it is standard pattern or right pattern. Visualize (or draw) the runway layout in relationship to your arrival to predict the pattern entry. Remind yourself of the TPA.
- Safety— Seat belts and shoulder harnesses on and tight. Landing Light On. Loose items and charts stowed, passengers reminded that you’ll be busy for the next few minutes and won’t be able to talk.
So now you have all of the one-time things done. You have an idea of the traffic pattern so now you can decide if it is time to descend. To make a comfortable 500 fpm descent you can use the rule of thumb. For a slow airplane, say a C172 or Cherokee, assume a descent speed of 120 kts. That’s 2 nm per minute. So the number of miles out that you need to start your descent is 4 times the number of feet (1,000s) you need to descend. Suppose you are at 5,500′ and TPA is 1,200′. Then you need to descend 4,000′. At 500 fpm that’s 8 minutes. In 8 minutes you’ll travel 16 nm. So start your descent at 4 times the number of feet (in 1,000s) you need to descend. If you are in a faster plane, say a Bonanza or C210, your descent rate might be more like 180 kts. In eight minutes you’ll travel about 24 miles. So start your descent at 6 times the number of feet (in 1,000s) you need to descend.
Report, Airspeed, Altitude, Gear, (Carb Heat, Throttle, Prop, Mixture, Flaps), Safety—RAAGS
Start off this portion of the checklist with Report. Call the tower or CTAF and let them know where you are, that you have ATIS, and your intentions. They’ll ask you to report at some location so make a note of it. Check your airspeed and altitude. Are you too high? Too fast? Now do the first run-through of the landing checklist. I do it in the physical order of the controls on the panel. First is gear. Check that the light is orange. Push it to see if it turns green. Carb heat would be next for planes that aren’t fuel injected. Then power—do we want to decrease power for the descent or build up speed. Prop next—increase by 2,000 RPM if power decreased. Mixture a few turns rich. Flaps should be up. Check temperatures to be sure they are where they belong. Then Scan aggressively for traffic.
At the first reporting point. Report, Airspeed, Altitude, Gear, Scan. Of course airspeed and altitude depend on Throttle, Prop, and Flaps so adjust accordingly.
Repeat this when entering the pattern, at the numbers, turning base, turning final.
In my Cessna 210 I want to be below gear and 10° Flaps range (160 MPH) before I enter the pattern and usually closer to 110 MPH.
Entering the pattern
  Boost Pump - If flying most low-wing airplanes.
  Carb Heat - If advised for carbureted airplanes.

  Report - If instructed or on CTAF
  Airspeed - Adjust pitch for 110 MPH
  Altitude - Pattern altitude
  Gear - Not yet
  Scan - Listen for and scan for traffic

  Throttle - Should be at 17" MP. Slowing to 110 MPH.
  Prop - Top of the Green
  Mixture - Richen - should be almost full rich by now.
At the numbers.
  Runway - does it match the number you are supposed to land on
  Airspeed - Aiming for 100 MPH
  Altitude - Pattern altitude
  Gear - Down

  Throttle - no change
  Prop - Full
  Mixture - Rich
  Flaps- Not yet unless very short approach
Turning Base
Report – in uncontrolled field report turning base as the wings are turned. It is easier to see a plane when it is in a standard rate turn than when flying level because the cross-section is larger. You also get sun glint from in a turn as well.
  Airspeed - aiming for 90 MPH
  Altitude - descending at 600 fpm so about 700 ft above touchdown
  Gear - Check for green light(s)
  Throttle - Pull ¾ if making short approach
  Prop - Full
  Mixture - Full
  Flaps - Add 10°
Turning Final
  Report - if necessary
  Airspeed - aiming for 80-85
  Altitude - descending at 600 fpm so about 400 ft above touchdown
  Gear - look out the window and see the wheels

  Throttle - Adjust for height
  Prop - nothing
  Mixture - nothing
  Flaps - add 10 or 20° depending on gusts
On final there are only two things that matter, airspeed and altitude. So keep looking out the window to get the right picture of the runway, then check airspeed. Adjust pitch and power. Repeat until ready to flare.
Over the threshold
  Runway - One more chance to make sure it is the right one.
  Altitude - How’s the sight picture
  Airspeed - If it’s not nailed, something is wrong. Go around.
  Gear - one more glance out the window.
  Throttle - just a bit of power, unless gusty
If you don’t have airspeed nailed when crossing the threshold, it could be because you forgot to lower the gear. Or maybe the flaps. It doesn’t really matter why the airspeed isn’t nailed, but it means that you aren’t in a stabilized approach and you need to go around.
If you fly any planes that require carb heat or fuel pumps for landing, you can add those two items at the numbers or entering the pattern depending on when the POH says to use them.
This method focuses on airspeed and altitude which are controlled by the pitch and power respectively with a little help from the flaps and gear.
This is the panel of the Cessna 210 described above.
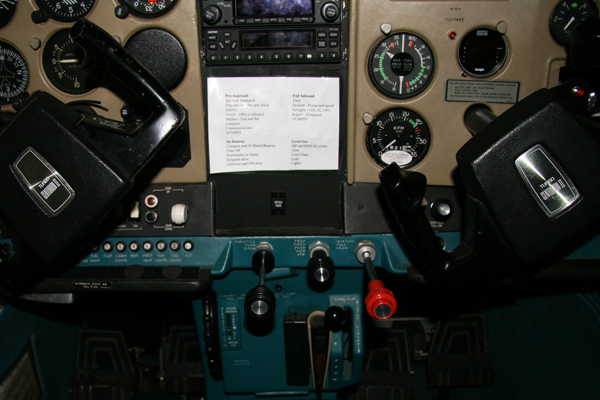
Note the positions of the gear on the left, throttle, prop, then mixture. The flaps are hidden by the right yoke.
This is the panel of a Commanche.

The basic approach to checking everything can be the same as with the 210, but the order will be different and there are some additional items. It is a low wing with carbureted engine so there is a boost pump, and carb heat to think about. The gear light is in the middle of the panel. Note the positions of the controls—mixture on the left, throttle, carb heat, then prop. The gear lights and handle are next to the VORs.