Doing the annual in your own hangar.
I just completed two annuals in my own hangar and thought I’d write up the tools and materials that I needed. In addition to my 80% bag, which I’ve been using for around 20 annuals on my planes and on others, I found that there are some things that you need to have in your hangar if you want to do an annual without running back and forth to your A&Ps hangar.
Miscellaneous
If you take apart the plane in a methodical fashion, it is way easier to put it back together. To me nothing is worse than trying to put an interior back together and having all the screws in one container. I use bead boxes—like the kind you get at craft stores. For a simple plane like the Cherokee, I use one for each wing and one for the interior. The 210 takes two in the interior. And a couple of salsa containers for the tail and brakes. I like to use a yogurt cup to hold the screws from each inspection plate, then dump them into a section of the box. If you start at one end of the wing and put each set of screws in its own container, it’s way easier to put it back together. Likewise in the interior—if you take things out in a rational order, it is much easier to put them back. It helps to keep the seat belts clean if you have some rubber bands to keep them out of the way.
You’ll need a notepad or at least some scrap paper for writing part numbers down—though I suppose you could use your phone for that. A camera comes in handy if you need to take things apart and it’s not obvious how they go back together.
On the last annual I used 3 rolls of Brawny paper towels. You can use shop towels, but I don’t think the added expense is worth it. I also used about 10 nitrile gloves.
I also keep a pair of regular gloves around for doing things like moving the jacks.
Shop lights. I don’t have any, but if you want to work a night or without the hangar door open, they would be very useful. Likewise, a good LED bar light would come in handy.
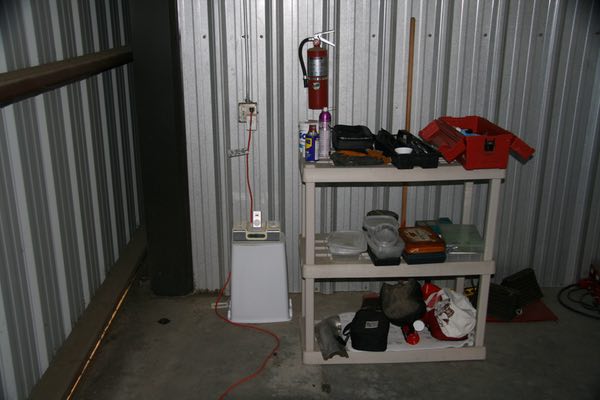
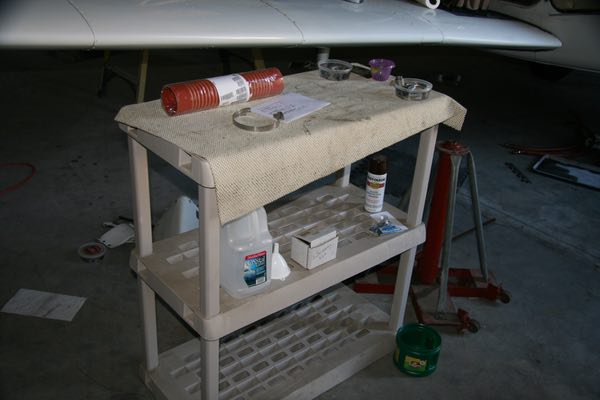
Rubber mats, secretarie’s chair, creeper. The rubber mats com in handy when working inside the plane, the creeper for underneath, and the secretaries’s chair for working on the engine. None of them are required—just nice to have. What is required is a flat surface to work on and a set of shelves to store stuff. I have a 6′ shelving set that I set up in two parts. One for storing parts and tools that I don’t use very often and one for a work surface.
You’ll generate a lot of oily rags and have lots of small trash when working on your plane. I like to have a couple of coffee cans lying around to toss bad screws and paper towels in. At the end of the day I take them home, dry out the rags that were used with solvents, and toss the rest in the trash. It helps to have a couple of plastic grocery bags around for the trash.
Jacks and tail-stand weights.
If you have a low-wing plane, it’s nice to jack it up when you are working under it. But in any case, you’ll need to jack it up to take the wheels off when you check and grease the wheel bearings. You can probably borrow your A&P’s but if you do much maintenance on you own plane, you’ll want your own.
It is extremely important to have enough weight on the tail stand. Even the little Cherokee needs at lest 300 lbs.
Lubrication
During the annual you need to make sure that all of the pulleys for the rudder and ailerons are lubricated. You also need to have all of the hinges and vents on the outside of the plane lubricated.
For external parts I like to use ACF-50. It is a lubricant and corrosion inhibitor. I have also used it internally, but my newest A&P prefers Tri-Flow. It is a teflon-based lubricant that isn’t as messy as ACF-50. We used it on the yoke and it slides without catching or making any noise. I’d recommend it anywhere that you don’t need the anti-corrosion properties of ACF-50. Lots of people use LPS-3 as well. Don’t use LPS-1. It is basically a cleaner with no lubrication properties. It is used for things like limit switches.
My planes use Aeroshell #5 for wheel bearings and Zerks but you should check with your A&P to see what you use. A bearing grease packer is required for packing the wheel bearings and a small grease gun for filling all of the bearings on the undercarriage that have a Zerk fitting.
Penetrants
For over the counter products, nothing beats Kano Kroil. It’s fairly expensive, but a can will last forever. The only place in town I found it was NAPA and it was $16. However, testing shows that a 50/50 mix of Automatic Transmission Fluid and Acetone works better. In tests, Kroil required 106 lbs of force to remove rusted bolts and the home-brew mixture required half that.
Adhesives
I haven’t had much call to glue anything down, but when I do, I use E6000. I recently glued two rubber grommets together where tubing went through a baffle and I glued some oil-soaked cloth to the airframe around the cowl. I also used it to glue some carpeting down. So far it works fine. I use popsicle sticks to apply it, but a spatula would work too.
Oil Change
I have a quick-drain on my Cherokee and to drain it into the garbage-company provided drain pan I need 4 feet of plastic tubing. The drain on the C210 is under the nosewheel so I use a piece of cardboard box to act as a funnel into the drain pan. When taking the oil filter off, it helps to wrap it in a large zip-lock bag. I can usually prevent any oil from getting on the engine if I am really careful removing the filter. Oil-filter cutters are really expensive, so you might want to use your A&P’s. But if you change your own oil, they’re a good investment.
Spark Plugs
You need to replace the spark-plug gaskets every time you check your plugs. The gaskets are maleable when new but harden when the engine has run. If you are really cheap, you can anneal them and reuse them as shown in this video—but they’re .37 each so why bother? You’ll also need a drop of anti-seize for each plug when replacing them. The Champion brand has been hard to find, but your A&P should have some.
You’ll need two wrenches to remove the spark-plug wires. One to hold the wire and one to turn the fitting. You’ll also need a socket for the spark plugs. When installing the plugs, it is important to have a calibrated torque wrench. If you don’t do a lot of maintenance on your own, this might be something that your A&P should provide.
To clean the lead out of your plugs, you’ll need a good pick and some really small picks. I bought a small screwdriver set from the dollar store that works well. Like the kind used for tightening eyeglasses. The are good for getting the difficult to reach pieces of lead out of the plugs. This can be really time consuming—especially for the bottom plugs. This might be one of the things that you take to your A&Ps hangar for cleaning and testing in his machine. The testing machines are really expensive, so you probably won’t want one of your own.
Spark-plug trays are surprisingly expensive ~$60 for a few pieces of metal. If you plan on moving the plugs, a couple of holes drilled in a 4×4 will work just as well. Otherwise, just lay them out on some paper towels and mark the towels.
Compression Testing
This is one piece of equipment that you probably don’t need to buy. You might want to buy a portable compressor if you don’t want to move the plane to your A&P’s hangar.
Cleaning and Corrosion Fixing
One of the best things about doing the annual in your own hangar is that you can take as much time as you want to clean the plane and fix corrosion.
Before starting the annual, I use a half-tub of non-abrasive GOJO to clean the belly and then give the plane a good wash. It’s amazing how much easier it is to work on a clean plane. The rest of the GOJO comes in handy while working on the engine and brakes.
When the wing-tips and tail pieces are off, I like to use ACF-50 to get all the dirt and dust off. When the wing tips are removed, there is a lot of bare metal where you can see dirt collecting. A couple of toothbrushes and some ACF-50 gets rid of the dust in the creases and adds corrosion protection while you are doing it. I like to use Colgate brushes from the dollar store, but any but the cheapest brushes work.
I often use Q-tips and white mineral spirits or Stoddard solvent for cleaning oil and grease from places that they don’t belong.
Miscellaneous Tools
A voltage tester can come in handy. Either a complete Fluke meter or just a simple pen type. Make sure it handles the voltage on your plane. This annual we used it to check continuity on the power receptacle before and after replacing it. On the 210 annual we used it for checking continuity on the landing light—turned out it was just a bit of corrosion on the wire ends. Lots of zip ties for keeping wires from rubbing in the engine compartment. Any time you remove something, it’s more than likely that you’ll cut some zip ties.
Copper anti-seize for the pins on the brake cylinders. Lots of Scotch-brite for cleaning electrical contacts and paint prep. I use a roll of green painters tape to mark things that I want the IA to look at. I also use it to mark places that I need to pay attention when putting the plane back together. If you need to fix any corrosion, you’ll need masking paper.
A wire stripper is handy if you need to replace any electrical stuff. I have a first aid kit in the hangar and I use at least a few band-aids on each annual.
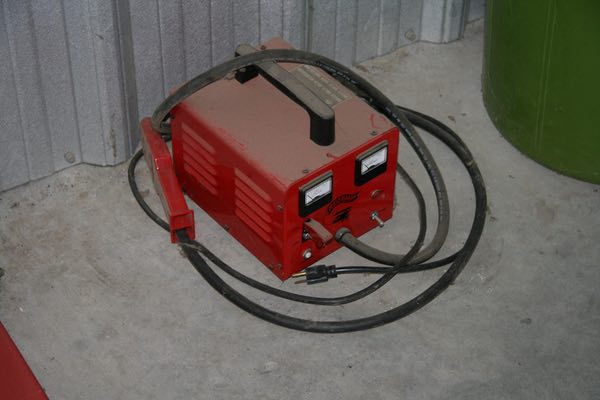
If you have a retractable, you might want to invest in an or borrow an external power supply. If you are just doing a couple of gear swings, the battery can handle it fine, but if you are doing some adjustments, you might wear down the battery.
Work Area
I use plastic shelves to store tools and supplies and for a work area. They are light weight and easy to move around. You can also take them apart for storage.