
Cessna T210L Annual: Part I
I think that every aircraft owner should do at least one owner-assisted annual and preferably assist in the pre-buy inspection. One big reason is that if, for example, you get a bill for four hours to remove the magnetos, you will understand why it took so long. The other reason is that, if you have a good IA and access to the parts manual, you can improve your pre-flight and hopefully avoid flying a plane that has safety issues.
Before You Start
On most airplanes, you need to change the air filter and do an oil change at the annual. So look in the books to find out the part numbers of the filters. You might also need brake pads, so take a look and see. If you can’t tell, order them anyway—they are relatively cheap and they don’t go bad sitting on the shelf. I like to keep a bunch of spark plug gaskets around. Again, they are cheap so get a bunch—I need 12 at each annual. I keep a half-dozen around in case I need to clean a fouled plug between annuals. If you are doing the annual in your hangar, get some different sizes of safety wire. It will save time running back to your IA’s hangar.
The 210 was painted a few years ago and had all new stainless screws installed. If you have an older plane, or one that is kept outside, you might want to invest in a stainless screw kit. They aren’t expensive and that way you can replace screws that have the heads torn up.
Next up is checking for recurring items. ELT batteries need to be replaced every two years and it is not something you can do yourself—you need an A&P to inspect it. I’m lucky with the ELT in the Cessna in that it uses D-cell batteries you can buy just about anywhere. The Cherokee uses a special battery that you can only get from aircraft supply stores.
I’m close enough to Aircraft Spruce that I get my order the next day, so I usually wait until we start the annual before I order—just in case something comes up that I forgot. e.g. I might be running low on ACF-50 for lubing the hinges, so I need to order a can. Or you might need a few cans of Plexus.
Check the AD list from the last annual for recurring ADs. Most, like the Bendix mag check, just require an inspection or test. If your mags are near 500 hours, then you’ll want to remove them after you do the initial runup and spark plug compression checks. If you have oxygen tanks, they need a hydro test every five years.
As I’ll explain later, you need at least four bead boxes. I get mine at Michael’s with their 50% off coupons. You’ll also need another half dozen or so plastic containers. I have a bunch of salsa containers but yogurt containers with lids will do as well. They only need to be big enough to hold a handful of screws.
You’ll also need a workbench and storage spot. I like to use a set of plastic shelves. I set it up with three shelves. The top is just the right height for taking apart ELTs, cleaning spark plugs, or reviewing the logs.
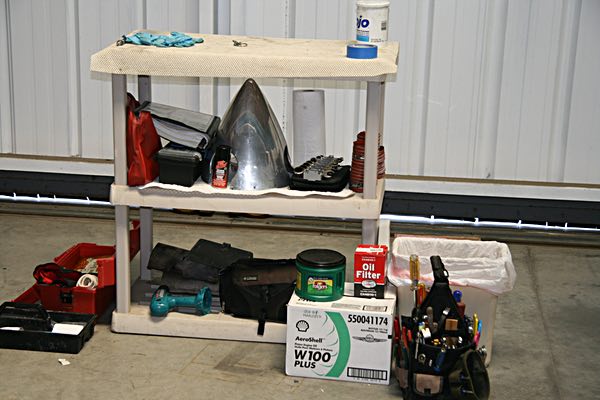
In a previous post Doing the annual in your own hangar I listed the tools and equipment that you should have handy.
Wash the Plane Before Starting
The 210 only has one inspection plate on the belly, so it doesn’t matter much if the plane is greasy. If you are working on low wing planes, there are lots of things on the belly and wing root that need to be removed. Grab a tub of Gojo (the kind with the blue label without pumice) and clean the belly before you start. You’ll be glad you did. I like to wash the rest of the plane as well. It’s much nicer to work on a clean plane than one that is covered in dust, bugs, and bird droppings.
But before you start, and I hope you are doing this on your pre-flight anyway, look over all of the surfaces for hot rivets, fuel stains, hydraulic fluid leaks, and exhaust trails where they shouldn’t be. If you find anything suspicious, you might want to get and A&P to look at it before you clean it up.
Tools For Taking Things Apart
I use a ratcheting screwdriver but an electric screwdriver would probably work as well. I have one that I use on the engine and greasy parts outside and another that I use for the interior and clean exterior parts. You’ll also need a regular screwdriver for screws that are tighter than normal. If you keep your plane outside, some Kroil wouldn’t hurt for screws that are stuck. You’ll also need a ladder that is tall enough for you to reach the top of the tail. I like to wear an apron to carry pens and hold my tools when I need two hands. When you get to the engine, you’ll want some vinyl or nitrile gloves. There are a couple of bolts in the interior, so you’ll need your ratchet set and wrenches for them.
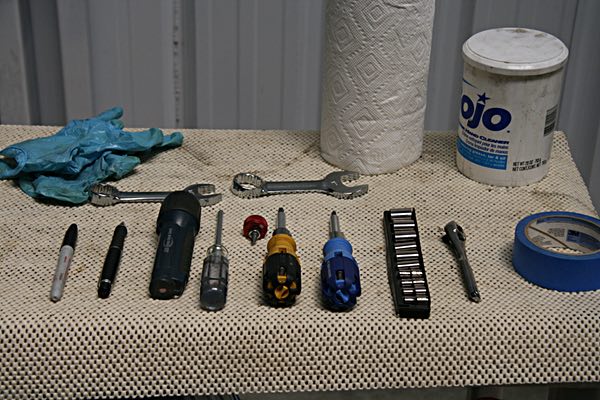
In the engine compartment, you’ll need a pair of cutters to cut the safety wire on the oil filter and the oil drain. I bought a set of stubby wrenches a while ago for getting into tight places and made sure that they went up to 1″. The oil drain uses a 7/8″ so they came in handy. I can usually take off the oil filter by hand but this time I needed my 1″ wrench to loosen it.
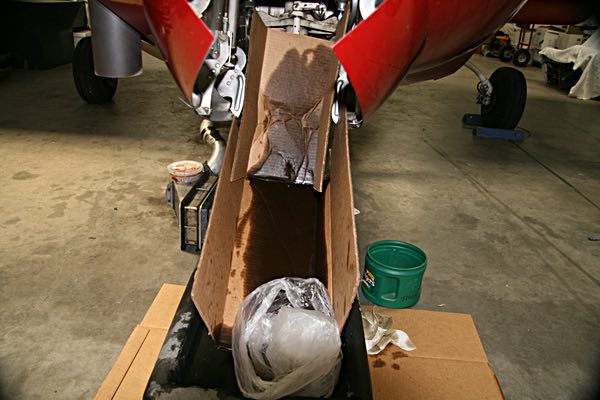
Draining the Oil
I like to fly the plane for a while to warm up the oil and get all the junk circulating. I don’t know if it makes a whole lot of difference. A lot of mechanics like to to the compression checks on a warm engine as well. The oil drain on the 210 is in the nose gear well. You need to open the gear doors to get to it. Pull the circuit breaker for the gear. Then use the hand pump to open the doors. It’s too tight in there for a quick drain, so we’ve worked out a process for getting the oil out of the plane and into the recycling container. We basically make a funnel out of a 4′ piece of cardboard. Snip the safety wire, use a 7/8″ wrench to loosen the nut, and then slowly untwist it until the oil starts to come out. After most of the oil has drained out, I remove the oil filter. The trick to removing the filter is to loosen it (by hand or with a 1″ wrench if it’s tight—be careful not to use any downward force) and then wrap the filter, and a couple of inches onto the filter mount, in plastic bags. If you are careful, you can remove it without getting oil on the engine. I put a couple of paper towels under the filter to catch any drips.
I usually let the oil drain for a couple of days while I work on other things. One thing I don’t do is put the drain plug back in. It needs to be safety wired and I don’t want to forget to do it. It’s really hard to reach in there and my wiring skills aren’t that great, so I usually let the IA wire it back up.
Taking Things Apart
This is incredibly time consuming. From start to finish it took 8 hours. And I’ve done this dozens of times before.
One of the big-ticket time-consuming surprises on Cessnas is related to the seat rail AD. I like to remove the interior and have the IA inspect the seat rails before he does anything else. If there is a problem, you know right at the beginning. If you haven’t ordered a spare set of brake linings, get the IA to look at the pads before you order parts. They have enough experience to tell if they need replaced just by looking at them.
I haven’t counted the inspection plates on the exterior of the 210, but there are around 50 of them. Which means that there are about 200 screws. Some are machine screws and some are sheet metal screws. And there are about four sizes. I’ve worked on planes where the IA dumped all of the screws from one wing into one container. Trying to find the screws to put back in the right place is incredibly time consuming. What I do is start at the wing root. I take off the faring over the door and put all the screws into the first spot in the bead box. The first inspection plate will catch on the door if you leave it attached, so I remove it. Then I work my toward the wingtip. I leave one screw in each plate. For plates near the ailerons or flaps, I make sure that they won’t catch when the surfaces are moved. Make sure you don’t miss the inspection plate on the aileron. On my 210 there are three inspection plates on the front of the wing that use tiny screws. Since there are more plates than spots in my bead box, I put all of them in the same slot. By the time I get to the wingtips, I’ve run out of spots, so I use a salsa container for the screws. I leave two screws on the top of the wingtip so that it doesn’t fall off when the plane bounces around. Repeat the process for the other wing.
On the tail, I use one salsa container for the strobe, one for the inspection plate under the rudder trim, one for the tail cone, and one for each side of the fairings. I also use one for the inspection plate on the fuselage near the tail. As you take them apart, notice that the screws on the end of the fairings are machine screws.
I use two bead boxes for the interior—one for the inspection plates on the floor and one for everything else. The screws in the cargo section are all the same, so I just dump them all in to a salsa container.
There are a few tricks that you should know when working on the interior. The first thing I do on the inside is remove all of the headsets, water bottles, and miscellaneous junk. Next, look for the pins on the seat rails that keep the seat from moving too far back. Remove the ones in the front and the ones in the back. Push the rear seats all the way back so that you have room to remove the front seats. On my year, the front seats won’t come out unless you remove a section of the seat rail. It is different for other years years. Once the seat rails are removed, push the seat all the way back until both of the back rollers are off the rail, then tilt the seat forward and remove the front rollers. This is where you need the extra two inches you get from pushing the middle seats all the way back. The middle seats are fairly easy to remove, with out any tricks.
Next comes the rear bench seat. There are two bolts that hold the front to the floor. There are also two pins that keep the back from sliding all the way out of the rail when it is folded down. And here’s the non-obvious part. There are two bolts on each side that you remove from inside the rear wheel well. They are the same size as the ones in the interior and really easy to spot. Surprisingly enough there is no special trick to putting them back in. It helps to have a pick to line up the holes. Just leave them a bit loose so you have some play for the ones inside, then tighten once the inside bolts are started.
You probably need to remove the seat belts for the front and middle rows in order to get the carpet out. If you don’t then use some rubber bands to bunch them up so the are out of the way and stay clean. You might even want to put them in plastic bags. Personally, I like to remove them even if it isn’t necessary.
I usually take the center console off next. It’s pretty obvious how to take it apart. The only trick is to remove the knob on the end of the handle and open the flaps half way so that the console. Pay attention to where the tiny screws on the side go.
Once the carpet is out, you may want to label each of the inspection plates. We started at the front and labelled pilot and co-pilot starting at one. There are two inspection plates in the rear that are partially under the side panel. We removed them this year, just to see what is there, but they don’t need to be removed every year. I needed to use a finger bit screwdriver to remove them.
There are three large inspection plates in the middle that overlap. We labelled them so we know which ones are on top. Unlike most inspection plates, the screws for these are not all the same. These plates are over the hydraulic lines, so you want to be sure that you don’t put long screws in where short ones are supposed to go. Also, some of them are structural, so you need to make sure that they go back where they came from. The structural ones are cadmium plated so they are gold colored. Since we’ll never remember where things go, we wrote it on the inspection plates. If in doubt, refer to the parts catalog.
Tools For Putting Things Back Together
In addition to your screwdriver, you’ll need a couple of straight picks, and a good flashlight.
Putting It Back Together
I like to have my IA inspect the interior and exterior so I can put it back together before we start on the engine and gear swing, etc. That way there aren’t open inspection plates to bump and wingtips and tail parts to fall off. And the less time the seats spend outside the plane, the better. I put everything but the seats and engine stuff back together in one long eight hour day. We left the front seats out so we can get to the oxygen tanks. That included a half hour spraying ACF-50 on the pulley bolts—being careful not to get any on the inside of the pulley itself. And spraying all of the hinges and Heim bearings on the wings. I was really tired when I got to the wings, so I just put the screws in and didn’t tighten them. I went back the next day and spent a half-hour methodically tightening all of the screws.
You probably won’t remember exactly where in the bead box each set of screws is, but its not to hard to get them back in the right place. Most of the ones next to each other have different numbers of screws, so you can tell by counting if you have the right plate. Just be careful to use the right kind of screw. When in doubt, look at the remaining screw to see whether it is a machine screw or a sheet metal screw. I always start the screws by hand so that I don’t strip out the hole. If you meet resistance, then either you aren’t lined up straight or you have the wrong kind of screw. All of the inspection plates on my 210 have the same kind of screws in each hole. On older planes, you will sometimes find that one or two screws is one size larger than the rest. Someone in the past has replaced a screw with a larger one because the hole has become enlarged. That’s one of the benefits of using a different spot in the bead box for each inspection port. If there is a larger screw, you know where it goes.
You need to be careful with the wing root fairing and the empennage fairings. On the wing root, the front two screws are sheet metal screws and the rest are machine screws. On tail, the screws on the end are machine screws and the rest are sheet metal. If you look carefully, you can se the threads where the machine screws go. Again, be careful not to force them.
The picks can come in handy for lining up the holes on the tail cone. You can also save yourself some frustration by making sure that all of the sheet metal nuts are lined up with the holes before you start putting the screws back in. It’s really frustrating to find out that you need to remove a dozen screws because one nut has shifted and the screw won’t catch.
Once everything is back together, check all the lights to make sure you haven’t accidentally cut any wires or pulled apart connectors.
A Note on Removing Hard to Turn Screws
Most of the time, the screws are easy to remove with your ratcheting screwdriver. Sometimes, they don’t turn. In that case you need a straight screwdriver with a good tip that is the right size. It’s somewhat counter intuitive, but push really hard on the screwdriver and slowly turn the screw. Sometimes I need to put my full weight on the screw. If it starts to jump out of the screw, stop. Spray a bit of Kriol or ACF-50 on it and let it sit. You really don’t want to strip the head. If that doesn’t work, your A&P can probably coax it out. When I first started taking planes apart, I had a bunch that I couldn’t remove. I’ve only had one screw on a spinner that stymied me in the last half-dozen years. I think that whoever put it in mis-threaded it. We soaked it overnight, and even then I couldn’t get it out but my IA could.
Changing the ELT Batteries
The good news on my ELT battery is that it only cost $15 for new batteries and the old ones are perfectly good for toys and flashlights. The bad news is that the battery compartment is screwed into the transmitter with really tiny hex bolts. It took over a half hour to remove the batteries and put in the new ones.
Total Time So Far
I spent about an hour reviewing the log books and ordering parts. Eight hours taking it apart, 7 1/2 hours putting it back together. So I’m up to 16 1/2 hours and still need to do the gear swing, wheel bearing inspection, compression check, pressure test on the exhaust system, and clean the plugs.